Audiotent Tip 418 - 3 Compression Techniques for Punch, Control and Clarity
The humble Compressor has been a staple part of any producer's toolkit, since modern music production techniques were established some 40 odd years ago.
Most people producing electronic music (or any other genre, for that matter), will have a decent understanding of compression as a means of dynamic control and will be able to utilise it effectively in their music. It can add that much needed punch, clarity and coherence tracks need, in order to compete with commercial standards and keep listeners' attention .
The use of compression described above, assumes that it is being used in its most common way; as an insert effect on a single channel (pictured below).

But let's look at 3 alternative ways of using the compressor to add a mixture of depth, rhythmic interest and overall sheen to our music.
This in its simplest form, means controlling one signal with that of another source.
In the below example, the incoming signal from the kick drum is telling the compressor to reduce the outgoing volume of the bass, thus creating that iconic 'ducking' or 'pumping' effect:
Make sure you have a fairly high ratio (10:1 or greater) and fast attack/release settings. The latter will ensure the compressor responds quickly to the incoming signal.
These can be altered to shape the response of the side-chaining.

But don't stop there! You can side-chain practically anything to anything - experiment with side-chaining parts like the snare/clap to a chords part:
Doing this amongst multiple parts will produce space in the mix, as well as a very interesting rhythmic interaction between your drums and other musical parts.
Often dubbed the 'secret sauce' of mix engineers, this technique can add excitement; power; and, clarity to your overall mix.
In this instance, we want to use the compressor as a 'send' effect instead of an 'insert'.
Create a new auxiliary channel in your DAW and create a compressor on it.

The aim here is to create a super-compressed and 'coloured' signal, which we will blend in with the rest of the mix. We need to use pretty extreme settings here, similar when side-chaining before. The difference is, that we want the compressor to kick-in very quickly (fast attack setting) and to stop compressing very slowly, so use a slow release value.

I like to use Logic X's 'Studio VCA' model, but experiment with others - Ableton's Glue compressor also sounds great for this technique. Achieve a gain reduction upwards of -10db and adjust the makeup gain to suit.
Now what we do is send individual parts of our track to the designated bus, until we see some decent level coming into the channel.

The key here is 'how much' of each part you add into your new, parallel compression mix. Try and not overdo it, as we don't really want to hear it, more feel it's presence.
Drums mix before parallel compression:
Drums mix after parallel compression:
As you can hear, the drums are much more lively. Send your other parts to the bus as you see fit. A good way to gauge how much by is to initially send it by a great deal, and then bring it back. This allows you to hear how much is 'too much'. (Also a great tip for EQ).
The final step is to now blend our parallel compression bus in with the mix, just enough so that the added depth is present.
There is a great more in-depth variation of this technique called the "Brooklyn" method. I will cover this in a future post!
This method uses multiple compressors (one after the other) and is usually applied to a single track, or the master channel.
One aim is to provide a single channel with several different compression qualities, thus achieving dynamic control, character and sustain.
The other, is to spread the workload amongst several different compressors. For instance, 4 compressors each achieving -1db of gain reduction, as opposed to one achieving -4db.

Single compressor achieving -4db of gain reduction:
The result of spreading the workload between several compressors is more dynamic preservation and precision control whilst mixing. It's a good idea to experiment with different compressor units & observe the dynamic qualities they offer.
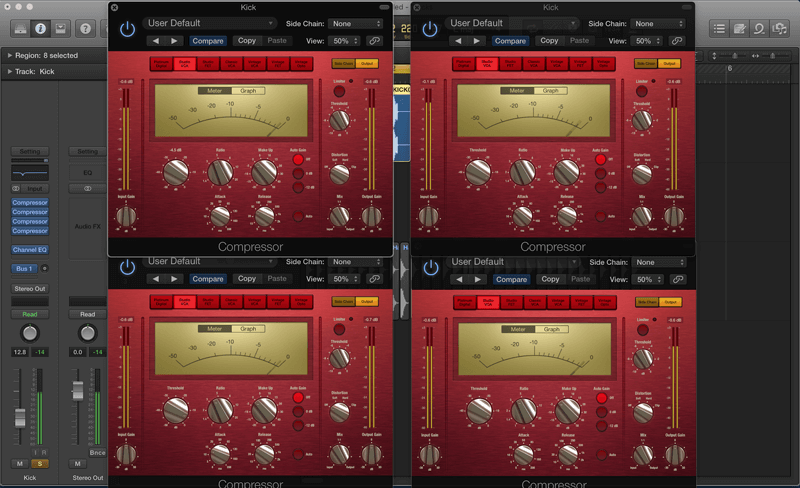
Serial compression - 4 compressors each achieving -1db each of gain reduction:
Next let's experiment with using serial compression to add various compression qualities to the master channel. This would commonly be found at the mastering stage, but can also be used on a sub mix, or even a single track.
The aim here, is to use the first compressor with a low ratio (2:1-4:1) and fast attack/release settings to catch peaks.
The second compressor will have a slightly higher ratio (4:1-6:1), yet slow attack/release settings. Aim for greater gain reduction (around -5db) by adjusting the threshold - this compressor will add sustain and 'beef' the signal up. Tweak the make-up gain until you achieve a comfortable level.

The left-hand, black compressor is set to catch peaks, the right-hand silver compressor to add sustain.
Again, experiment with different compressor models - A FET model will typically respond better to peaks, whereas an Opto model is better at responding to RMS. Some compressors have a switchable Peak/RMS control - perfect for use in this technique.
Drum, synth and bass line mix, before serial compression:
Drum, synth and bass line mix, with above compression applied:
I hope you have enjoyed exploring the creative possibilities and mix enhancement opportunities compression can offer your music. If you have any questions please ask them in the comments below.
The humble Compressor has been a staple part of any producer's toolkit, since modern music production techniques were established some 40 odd years ago.
Most people producing electronic music (or any other genre, for that matter), will have a decent understanding of compression as a means of dynamic control and will be able to utilise it effectively in their music. It can add that much needed punch, clarity and coherence tracks need, in order to compete with commercial standards and keep listeners' attention .
The use of compression described above, assumes that it is being used in its most common way; as an insert effect on a single channel (pictured below).

But let's look at 3 alternative ways of using the compressor to add a mixture of depth, rhythmic interest and overall sheen to our music.
1) Side-chaining
This in its simplest form, means controlling one signal with that of another source.
In the below example, the incoming signal from the kick drum is telling the compressor to reduce the outgoing volume of the bass, thus creating that iconic 'ducking' or 'pumping' effect:
Make sure you have a fairly high ratio (10:1 or greater) and fast attack/release settings. The latter will ensure the compressor responds quickly to the incoming signal.
These can be altered to shape the response of the side-chaining.

But don't stop there! You can side-chain practically anything to anything - experiment with side-chaining parts like the snare/clap to a chords part:
Doing this amongst multiple parts will produce space in the mix, as well as a very interesting rhythmic interaction between your drums and other musical parts.
2) Parallel compression - The "New York" technique
Often dubbed the 'secret sauce' of mix engineers, this technique can add excitement; power; and, clarity to your overall mix.
In this instance, we want to use the compressor as a 'send' effect instead of an 'insert'.
Create a new auxiliary channel in your DAW and create a compressor on it.

The aim here is to create a super-compressed and 'coloured' signal, which we will blend in with the rest of the mix. We need to use pretty extreme settings here, similar when side-chaining before. The difference is, that we want the compressor to kick-in very quickly (fast attack setting) and to stop compressing very slowly, so use a slow release value.

I like to use Logic X's 'Studio VCA' model, but experiment with others - Ableton's Glue compressor also sounds great for this technique. Achieve a gain reduction upwards of -10db and adjust the makeup gain to suit.
Now what we do is send individual parts of our track to the designated bus, until we see some decent level coming into the channel.

The key here is 'how much' of each part you add into your new, parallel compression mix. Try and not overdo it, as we don't really want to hear it, more feel it's presence.
Drums mix before parallel compression:
Drums mix after parallel compression:
As you can hear, the drums are much more lively. Send your other parts to the bus as you see fit. A good way to gauge how much by is to initially send it by a great deal, and then bring it back. This allows you to hear how much is 'too much'. (Also a great tip for EQ).
The final step is to now blend our parallel compression bus in with the mix, just enough so that the added depth is present.
There is a great more in-depth variation of this technique called the "Brooklyn" method. I will cover this in a future post!
3) Serial Compression
This method uses multiple compressors (one after the other) and is usually applied to a single track, or the master channel.
One aim is to provide a single channel with several different compression qualities, thus achieving dynamic control, character and sustain.
The other, is to spread the workload amongst several different compressors. For instance, 4 compressors each achieving -1db of gain reduction, as opposed to one achieving -4db.

Single compressor achieving -4db of gain reduction:
The result of spreading the workload between several compressors is more dynamic preservation and precision control whilst mixing. It's a good idea to experiment with different compressor units & observe the dynamic qualities they offer.

Serial compression - 4 compressors each achieving -1db each of gain reduction:
Next let's experiment with using serial compression to add various compression qualities to the master channel. This would commonly be found at the mastering stage, but can also be used on a sub mix, or even a single track.
The aim here, is to use the first compressor with a low ratio (2:1-4:1) and fast attack/release settings to catch peaks.
The second compressor will have a slightly higher ratio (4:1-6:1), yet slow attack/release settings. Aim for greater gain reduction (around -5db) by adjusting the threshold - this compressor will add sustain and 'beef' the signal up. Tweak the make-up gain until you achieve a comfortable level.

The left-hand, black compressor is set to catch peaks, the right-hand silver compressor to add sustain.
Again, experiment with different compressor models - A FET model will typically respond better to peaks, whereas an Opto model is better at responding to RMS. Some compressors have a switchable Peak/RMS control - perfect for use in this technique.
Drum, synth and bass line mix, before serial compression:
Drum, synth and bass line mix, with above compression applied:
I hope you have enjoyed exploring the creative possibilities and mix enhancement opportunities compression can offer your music. If you have any questions please ask them in the comments below.


Leave a comment
This site is protected by hCaptcha and the hCaptcha Privacy Policy and Terms of Service apply.